Having had some success in building a DIY equivalent to the USB-COM cable, I started to think about the COM-IP controller. Texecom sell this at great expense. It provides an Ethernet interface from the panel, which allows you to configure the panel over the network rather than having to connect directly to the panel. It also allows you to connect other things in to the panel to provide remote control or get status information from it. The first problem is the price. CTS-Direct have it for just over £90 plus delivery and this seems to be about right. Numerous other retailers have it for the same price although there are some second hand deals on ebay which are a bit better. However this still costs more than the panel did which seems a bit much for such a tiny device:  I have been investigating linking the panel up with other home automation kit (more later) and someone suggested to me that you could use ser2net running on a Raspberry Pi or similar in conjunction with the USB serial connection I already had in order to give the same results. First thing was to see what the serial connection is actually doing, and establish what the parameters for the serial connection are. I used a serial port sniffer to identify this. I tried a few but eventually found ‘Free Device Monitoring Studio‘ which is massive overkill, but does provide the basic functions needed. I ran this whilst connecting to the panel with Wintex. I was hoping to see some comprehensible data but in fact it is clearly encoded. However, I was able to get the serial parameters out which are:
19200 baud, 8 data bits, no parity, 2 stop bits
This is the first time I have ever seen a serial link which uses 2 stop bits – so maybe this is a sneaky trick by Texecom to get you to buy their product. If so then it is fairly easy to get around. The next thing to do is to set up ser2net. It forms part of most Linux repositories, and the Raspberry Pi is no exception. I’ve started with a fairly basic and clean install, booting to the command line. Then I have installed ser2net like so:
apt-get install ser2net
Then plug in the serial cable and it should be recognised and appear as a serial device. You can use the ‘dmesg’ command in Linux to check. I’m using a FTDI 232R device:
[166583.359561] usb 5-1: new full-speed USB device number 2 using ohci-pci
[166583.821660] usb 5-1: New USB device found, idVendor=0403, idProduct=6001
[166583.821673] usb 5-1: New USB device strings: Mfr=1, Product=2, SerialNumber=3
[166583.821680] usb 5-1: Product: FT232R USB UART
[166583.821685] usb 5-1: Manufacturer: FTDI
[166583.821690] usb 5-1: SerialNumber: A9C3JDH1
[166583.927074] usbcore: registered new interface driver usbserial
[166583.927109] usbcore: registered new interface driver usbserial_generic
[166583.927136] usbserial: USB Serial support registered for generic
[166583.936455] usbcore: registered new interface driver ftdi_sio
[166583.936482] usbserial: USB Serial support registered for FTDI USB Serial Device
[166583.936601] ftdi_sio 5-1:1.0: FTDI USB Serial Device converter detected
[166583.936658] usb 5-1: Detected FT232RL
[166583.936662] usb 5-1: Number of endpoints 2
[166583.936665] usb 5-1: Endpoint 1 MaxPacketSize 64
[166583.936669] usb 5-1: Endpoint 2 MaxPacketSize 64
[166583.936672] usb 5-1: Setting MaxPacketSize 64
[166583.939669] usb 5-1: FTDI USB Serial Device converter now attached to ttyUSB0
The next step is to set up ser2net to connect to the USB serial port and convert it to network frames. This is done by putting a line in the configuration file – held in /etc/ser2net.conf. I’ve used this line:
10001:raw:0:/dev/ttyUSB0:19200 8DATABITS NONE 2STOPBITS
‘10001’ is the port number (used later); ‘raw’ means that there is no further processing of the frames; ‘/dev/ttyUSB0’ is the name of the serial device as above; the rest of the line contains the serial parameters we found above. Restart ser2net to re-read the config file, and then you will have in effect a working equivalent of the COM-IP. To make use of it you will need to IP address of the server running ser2net and the port number as above. The most obvious use of this is to use Wintex (the Texecom configuration tool) over the network. Configuring this is the same as for the genuine COM-IP although it is a little obscure. You need to go into ‘Edit Account’ in Wintex: 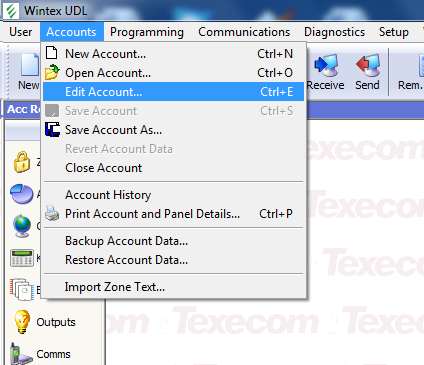 And then select the ‘Panel Details’ tab:
  It’s hidden away in the bottom right hand corner under ‘Network Details’ – here you need to enter the IP address of the server, and the port configured in ser2net. Once you’ve done this, you can connect to the panel using the ‘Connect’ button in the Wintex main screen and proceed as normal. So far as I can tell this approach exactly replicates the function of the real COM-IP but at a fraction of the price, or indeed free if you already have a Raspberry Pi or a server lying around. There are some other interesting ideas for making use of this which I’ll come to in future posts.

")
")


